
【SUMMARY】
Malaria is caused by a protozoan which invades human red blood cells. Malaria
is one of the world’s most prevalent diseases. According to the WHO, the
worldwide prevalence of the disease is estimated to be 300-500 million cases
and over 1 million deaths each year. Most of these victims are infants, young
children. Over half of the world’s population lives in malarious areas.
Microscopic analysis of appropriately stained thick and thin blood smears has
been the standard diagnostic technique for identifying malaria infections for
more than a century. 2 The technique is capable of accurate and reliable
diagnosis when performed by skilled microscopists using defined protocols. The
skill of the microscopist and use of proven and defined procedures, frequently
present the greatest obstacles to fully achieving the potential accuracy of
microscopic diagnosis.
Although there is a logistical burden associated with performing a
time-intensive, labor-intensive, and equipment-intensive procedure such as
diagnostic microscopy, it is thetraining required to establish and sustain
competent performance of microscopy thatposes the greatest difficulty in
employing this diagnostic technology.
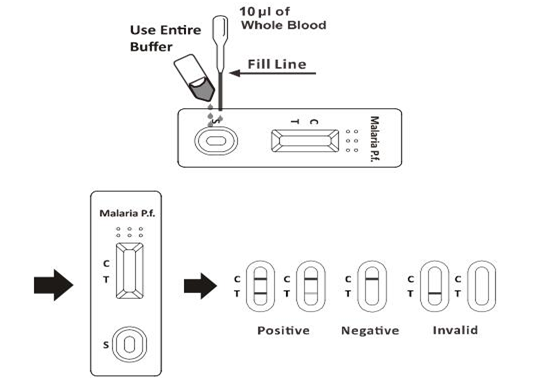
The Malaria P.f. Rapid Test Cassette (Whole Blood) is a rapid test to
qualitatively detectthe presence of the P.f. antigen. The test utilizes colloid
gold conjugate to selectivelydetect P.f. antigen in whole blood.
【DIRECTIONS
FOR USE】
Allow the test, specimen, buffer and/or controls to reach room temperature (15-
30°C) prior to testing.
1. Open the pouch, remove out the test cassette. Twist off the tab of the
buffer vial without squeezing. Then place it on a clean and level
surface.
2. Carefully pull of the sterile lancet cap.
3. Use the provided alcohol swab to clean the puncture site.
4. Push the sterile lancet firmly into the chosen site. Let a large drop of
free flowing blood collect at the puncture site. To increase blood flow, use
the thumb and forefinger to gently apply pressure around the puncture
site.
5. Add the blood specimen to the test cassette using the disposable dropper
provided.
6. Hold the dropper vertically; draw the specimen up to the Fill Line as shown
in illustration below (approximately 10 μl). Transfer the specimen to the
specimen well, then add the entire buffer, and start the timer.
7. Wait for the colored line(s) to appear. Read results at 10 minutes. Do not
interpret the result after 20 minutes.